Networking setup for FAUST CTF 2019
Our team decided to take part to this year’s FAUST CTF, but being this an attack/defense competition and us not able to physically get together for the whole duration of it, we had to improvise - there were less than 24h left before the start of the competition - a remote setup.
This is the structure that the organizers referred to in their docs, with the 10.65.0.0/16 subnet being VPN tunnels between each team and them:

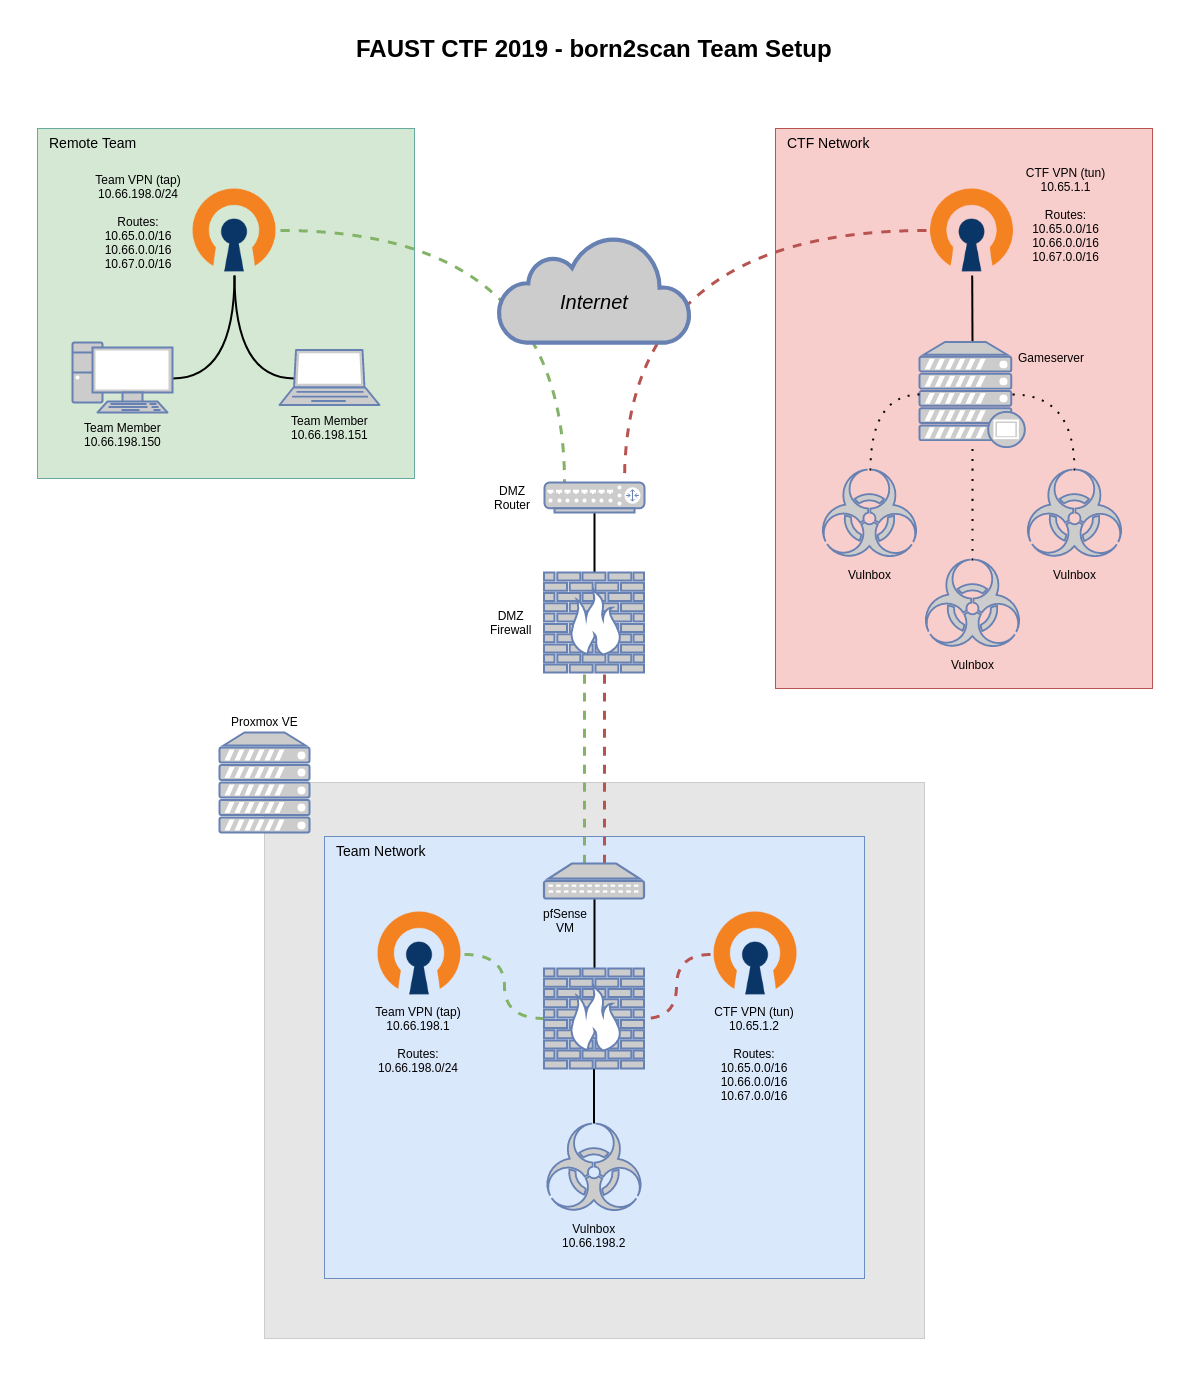
And this is a simplified version of what we came up with (click on the image for an SVG version):
Generally speaking, our structure included a virtualized box to host our team’s CTF services (the Vulnbox) and two VPNs: one for connecting our Vulnbox to the CTF’s network and the other to give remote team members access to the said network. While this sounds simple, it hides a few routing hassles.
Local-side setup
The whole infrastructure was hosted in my Proxmox-powered lab environment, which helped abstracting a few segregation nuisances: a pfSense instance was attached to both my DMZ’s WAN and a new virtual bridge with no physical ports assigned, thus enabling me to manage a dedicated & firewalled “secondary DMZ” which would become the Vulnbox’s LAN.
Since the FAUST staff ditributed OVA and QCOW2 images of the Vulnbox, a new KVM VM was created in Proxmox and its network interface was attached to the aforementioned empty virtual bridge. Its CPU type was set to host instead of the usual kvm64 I use (this VM won’t ever be migrated), NUMA and PCID were enabled. PfSense was then set up to handle the usual LAN business (DHCP, DNS forwarding to the DMZ’s router, etc).
After having tested the basic networking functionality of the VM, its disk image was replaced with the CTF’s QCOW2 image. Note: Proxmox didn’t reflect the change of the disk’s size, but since this was a one-off deployment I didn’t bother with any other change apart from brutally replacing the VM’s image at the shared storage level.
The Vulnbox image had the US keyboard layout selected by default, so I’ve used a simple trick to get my public SSH key into it during the initial automated setup that asked for your team ID and keys: I’ve used an online keyboard layout selector to change the needed special symbols (-, +, /, =, …) in my key and then a clipboard helper to actually paste that into the VM’s VNC client:
1 | sleep 3 && xdotool type --delay 100 "$(xclip -selection clipboard -o)" && xdotool key Return |
CTF-side setup
The next step was to make PfSense handle an OpenVPN server (“Team VPN”) and a client (“CTF VPN”). The client’s configuration took some trial and error, since the FAUST staff gave each team an OpenVPN configuration file which was tailored for a simpler setup than ours and pfSense doesn’t include any tool for merging an ovpn file with its web counterpart. In the end, a few options had to be specified as custom ones as well as copying the file’s static key over as a non-autogenerated shared key:
1 | persist-tun |
My best suggestion for this approach would be to try to integrate one directive at a time from the ovpn file into pfSense’s interface, and closely monitoring the OpenVPN service logs for hints on how to proceed.
This VPN (“CTF VPN” in the diagram) used the 10.65.198.0/32 subnet for internal routing (198 was our team’s ID) and advertised these outgoing routes: 10.66.0.0/16, 10.67.0.0/16. Since this was a standard tun-based VPN, Layer 3 traffic was automatically routed.
Remote-side setup
Now comes the tricky part: letting remote team members join this network without additional hops (transparent interaction with our and other team’s Vulnboxes was needed). After having tried to make another tun-based VPN cooperate with the CTF’s one, it became evident to me that a tap-based solution would have solved the problem in a much easier way.
PfSense was configured to run an OpenVPN server in Remote Access ( SSL/TLS + User Auth ) and tap modes, so after having created a dedicated user, an internal CA, and having issued the needed certs (server- & user-side), the new tunnelled interface was finally bridged to the Vulnbox’s LAN one. Since DHCP forwarding was enabled, the address space for this tunnel was reduced to 10.66.198.150-200 (no more than a handful of clients were expected). The routing is what the tap really simplified: since it operates at Level 2, the following pre-advertised routes were pushed on without further routing: 10.65.0.0/16, 10.66.0.0/16, 10.67.0.0/16.
In the end a rather standard OpenVPN configuration was handed out to team members:
1 | dev tap |
When connected, clients would receive the needed routes from the other tun VPN and the CTF’s submissions server (submission.faustctf.net => 10.67.1.4) was reachable through the correct hops:
1 | $ ip route |
Summing up
While setting up this networking infrastructure wasn’t an easy task due to the very limited testing options available before the CTF started and the outgoing VPN was enabled, the outcome has been a solid and reliable setup. This sub-DMZ was firewalled from the rest of my “real” DMZ but still had Internet access during the initial setup of the Vulnbox, and the added test points and increased network monitoring capabilities helped a great deal in the Defense portion of this CTF.
